subst e: c:\intel
subst e: /d
'scrap' 카테고리의 다른 글
| Visual Studio 단축키 (0) | 2010.03.18 |
|---|---|
| 증분링크 (0) | 2010.03.18 |
| Gentoo Linux 설치 (0) | 2010.03.18 |
| WSS / MOSS Sp2 설치 (1) | 2010.03.18 |
| MOSS Content Library의 받는 메일 설정 (0) | 2010.03.18 |
subst e: c:\intel
subst e: /d
| Visual Studio 단축키 (0) | 2010.03.18 |
|---|---|
| 증분링크 (0) | 2010.03.18 |
| Gentoo Linux 설치 (0) | 2010.03.18 |
| WSS / MOSS Sp2 설치 (1) | 2010.03.18 |
| MOSS Content Library의 받는 메일 설정 (0) | 2010.03.18 |
요즘 많은 배포판에서는 UTF-8을 기본 로케일로 사용하는데, EUC-KR이 있다는 것은 좀 아쉽군요.
http://www.kernel.org/pub/linux/kernel/v2.6/
틈틈히 설치하다보니 몇일이나 걸린지 모르겠네요.
혹시 필요하신 분이 있을지 몰라 이곳에도 올려둡니다.
아참, 설치하면서 마구마구 적은 것이라서 오류가 있을지 모르니, 혹시 오류를 발견하시는 분은 알려주세요...
원본 및 최신업데이트를 구할 수 있는 곳: jedison.tistory.com
Install Gentoo Linux on VMware
목차
0.준비과정
0.1.VMware설정
0.1.1.가상머신만들기
0.1.2.네트워크설정
0.1.2.1.Host OS 설정
0.1.2.2.VMware 설정
0.1.2.3.Guest OS 설정
0.2.CD받기
0.3.네트워크설정
0.3.1.ifconfig 이용
0.3.2.net-setup 이용
0.4.원격설치환경설정
0.4.1.root 암호설정
0.4.2.sshd설정
0.5.파티션설정
0.5.1.파티션계획
0.5.2.포맷
0.5.3.마운트
1.stage 1 시작
1.1.Stage 1 타르볼 다운로드 및 압축해제
1.2.네임서버정보 복사
1.3.미러설정
1.4.컴파일 환경 설정
1.5.proc 사용설정
1.6.물리HDD로 이동(chroot)
1.7.portage tree 가져오기
1.8.bootstrap
2.stage 2 시작
2.1.System 설치
2.2.컴퓨터 이름 설정
2.3.네트워크설정
3.stage 3 시작
3.1.시스템 시간 설정
3.2.파티션 정보 설정
3.3.kernel 설치
3.3.1.Gentoo 전용 Kernel 설치
3.3.2.사용자 Kernel 설치
3.3.3.Kernel Panic
3.4.필수 패키지 설치
3.4.1.SSH Daemon 설치
3.4.2.Log Daemon 설치
3.4.3.Cron Daemon 설치
3.4.4.reiserfsprogs 설치
3.4.5.Hotplug 설치
3.4.6.vim 설치
3.5.사용자 설정
3.5.1.root 패스워드 설정
3.5.2.일반 사용자 추가
3.6.Bootloader 설치
3.7.1.lilo 설치
3.7.2.grub설치
3.8.재부팅
4.stage 4 시작
4.1.X-window설치
4.1.1.X Server 설치
4.1.1.마우스 프리
4.2.Desktop environment
4.2.2.KDE
4.3.vmware-tool 설치
4.3.1.임시폴더 생성
4.3.2.프로그램 마운트
4.3.3.설치프로그램 시작
4.3.4.환경설정 시작
4.3.5.부팅 후 적용
4.3.6.임시폴더 삭제
4.4.한글설정
4.4.1.한글 글꼴 설치
4.4.2.한글 입력기 설치
4.4.3.한글 입력기(nabi) 설정
4.4.3.1./etc/env.d/00basic
4.4.3.2./etc/env.d/02locale
4.4.3.3./etc/profile
4.4.3.4./etc/locale.gen
4.4.3.5.gtkrc-2.0
4.4.3.6.환경재설정
4.4.4.한영키, 한자키 등록
================================================================================================================================
0.준비과정
젠투의 설치과정은 시작하는 stage에 따라 3가지로 구분되며 준비과정은 stage에 상관없이 반드시 거쳐야 하는 설치과정이다.
0.1.VMware
0.1.1.가상머신만들기
File > New > Virtual Machine
Virtual machine configuration: Custom
Virtual machine format: New - Worksatation 5
Guest operationg system: Linux, Other Linux 2.6.x kernel
Virtual machine name: GentooLinux
Location: D:\VMware\GentooLinux
Processors: Two
Memory: 512MB
Network connection: Use host-only networking
I/O adapter types: IDE Adapter (ATAPI)
SCSI Adapters: BusLogic
Disk: Create a new virtual disk
Virtual Disk Type: SCSI (Recommended)
Disk Size (GB): 36GB
Disk file: GentooLinux
0.1.2.네트워크설정
0.1.2.1.Host OS 설정
제어판 > 네트워크연결 > 인터넷에 직접 연결된 어댑터 > 속성 > 고급
인터넷 연결 공유, 다른 네트워크 사용자가 이 컴퓨터의 인터넷 연결을 통해 연결을 할 수 있도록 허용에 체크
홈 네트워킹 연결: VMware Network Adapter VMnet1
방화벽설정:
1.없애기
제어판 > 네트워크 연결 > 로컬 영역 연결 > 속성 > 고급 > Windows 방화벽 > 설정 > 고급 > 네트워크 연결 설정 > 로컬 영역 연결 > 체크해제
2.예외
포트추가: 22, SSH
0.1.2.2.VMware 설정
VM > Settings > Ethernet에서 Host-Only로 설정
0.1.2.3.Guest OS 설정
IP: 192.168.0.180
Subnet Mask: 255.255.255.0
Gateway: 192.168.0.1
DNS: 192.168.0.1
0.2.CD받기
젠투 시디는 아래의 주소에서 받을 수 있다.
http://www.gentoo.org/main/en/where.xml
0.3.네트워크설정
부팅을 한 후 ifconfig 혹은 net-setup을 통하여 네트워크설정을 한다.
0.3.1.ifconfig 이용
# ifconfig eth0 192.168.0.180 netmask 255.255.255.0 broadcast 192.168.0.255
# route add default gw 192.168.0.1
# echo nameserver 192.168.0.1 > /etc/resolv.conf
0.3.2.net-setup 이용
# net-setup eth0
아래는 net-setup eth0를 실행시켰을 때 설정해야할 값입니다.
------------------------------------------------------------------------------------------------
ip address : 네트웍카드에 할당하려는 IP주소 = > ex) 192.168.0.180
broadcast address : 네트웍안의 모든 호스트에 브로트캐스트할 IP 주소 = > ex) 192.168.0.255
network mask : 호스트와 네트웍을 확인하기 위한 주소 범위를 보여주는 IP 주소와 함께 사용되는 마스크 => ex) 255.255.255.0
gateway : 외부로 나가는 패킷을 전송하기 위한 IP 주소 => ex) 192.168.0.1
------------------------------------------------------------------------------------------------
0.4.원격설치환경설정
젠투의 강점중의 하나가 원격설치를 지원한다는 것이다.
VMware에 설치할 경우 ctrl+shift를 이용해서 가상머신과 실제머신을 왔다갔다해야 하는데
원격설치를 이용하면 가상머신은 켜두기만 하고 실제머신에서 ssh를 이용하므로 ctrl+shift를 이용할 필요가 없다.
또한 설치하는 머신이 가상머신이라는 것만 다르고, 나머지는 실제머신과 똑같다.
0.4.1.root 암호설정
livecd # passwd
암호를 묻는 프롬프트가 나오면 원하는 암호를 입력한다.
필자는 그냥 vmware라고 입력했다.
0.4.2.ssh
livecd # /etc/init.d/sshd start
이제 ssh client를 실행시켜서 vmware로 접속하도록 하자.
0.5.파티션설정
젠투에서 사용할 하드디스크의 파티션을 설정한다.
0.5.1.파티션 계획
-------------------
/boot: 100MB
: 1024MB
/ : 나머지 MB
-------------------
livecd ~ # fdisk /dev/sda :: fdisk 모드로 진입하는 명령어이다.
아래는 fdisk mode에서 실행하는 명령어이다.
------------------------------------------------------------------------------------------------
n > p > 1 > [enter] > +100MB
n > p > 2 > [enter] > +1024MB
n > p > 3 > [enter] > [enter]
t > 2 > 82
w
------------------------------------------------------------------------------------------------
0.5.2.포맷
livecd ~ # mke2fs /dev/sda1 :: boot 파티션 ext2으로 포맷
livecd ~ # mkswap /dev/sda2 :: swap 파티션으로 포맷
livecd ~ # mke2fs -j /dev/sda3 :: root 파티션 ext3으로 포멧
0.5.3.마운트
livecd root # swapon /dev/sda2 :: swap으로 잡은 파티션을 사용하도록 설정한다.
livecd root # mount /dev/sda3 /mnt/gentoo :: root로 잡은 파티션을 마운트한다.
livecd root # mkdir /mnt/gentoo/boot :: boot 디렉토리를 만든다. /boot 마운트 포인트 생성하기
livecd root # mount /dev/sda1 /mnt/gentoo/boot :: boot 파티션을 마운트 한다. /boot 파티셜을 활성화한다.
이제 준비과정이 모두 끝났다. 원하는 설치방법에 따라 2, 3 번으로 이동하여 계속 진행한다.
stage1부터 시작하고 싶을 경우: 1번으로 이동
stage2부터 시작하고 싶을 경우: 2번으로 이동
stage3부터 시작하고 싶을 경우: 3번으로 이동
1.stage1 시작
stage1의 목적은 bootstrap이다.
bootstrap은 stage2의 system을 설치하기 위한 컴파일 환경을 만드는 작업이다.
1.1.Stage 1 타르볼 다운로드 및 압축해제
livecd ~ # cd /mnt/gentoo
livecd gentoo # wget http://ftp.jaist.ac.jp/pub/Linux/Gentoo/releases/x86/2007.0/stages/stage1-x86-2007.0.tar.bz2
livecd gentoo # tar -xvjf stage1-x86-2007.0.tar.bz2
1.2.네임서버정보 복사
livecd gentoo # cp /etc/resolv.conf /mnt/gentoo/etc/resolv.conf
1.3.미러설정
livecd gentoo # mirrorselect -i -o >> /mnt/gentoo/etc/make.conf
1.4.컴파일 환경 설정
livecd gentoo # vi /mnt/gentoo/etc/make.conf
아래는 필자의 컴파일 환경 설정이다.
-----------------------------------------------------------
CFLAGS="-O2 -mtune=i686 -pipe"
CXXFLAGS="${CFLAGS}"
CHOST="i686-pc-linux-gnu"
GENTOO_MIRRORS="http://ft.jaist.ac.jp/Linux/Gentoo/"
-----------------------------------------------------------
1.5.proc 사용설정
livecd gentoo # mount -t proc proc /mnt/gentoo/proc
proc 의 용도는 아래와 같다.
따라서 proc를 마운트 한다는 것은 시스템상에서 생성되는 프로세스를 관리한다는 의미이며,
proc를 마운트하지 않고는 물리HDD로 이동할 수 없다.
1.6.물리HDD로 이동(chroot)
livecd gentoo # chroot /mnt/gentoo /bin/bash
livecd / # env-update
livecd / # source /etc/profile
1.7.portage tree 가져오기
livecd / # emerge --sync ::/usr/portage로 portage tree를 다운로드한다.
1.8.bootstrap
livecd / # cd /usr/portage/
livecd portage # scripts/bootstrap.sh
시스템에 맞게 gcc, gliblc 등의 C 컴파일러를 설치하는 과정이다.
이 과정을 bootstrap이라고 하며 이 과정을 마치게 되면 젠투를 시스템에 설치하기 위한 컴파일러 설치가 끝난 것이다.
bootstrap과정을 마치고 나면 스냅샷을 찍어두자.
스냅샷이름: Stage1 완료
2.stage 2 시작
stage2부터 시작한다는 것은 bootstrap과정은 이미 완료된 것이다.
stage2의 목적은 기본적인 젠투시스템을 설치하는 것이다.
2.1.System 설치
livecd / # env-update :: bootstrap하면서 설치한 패키지를 적용한다.
livecd / # source /etc/profile :: bootstrap하면서 설치한 패키지를 적용한다.
livecd / # emerge --nodeps gdbm libperl perl :: perl과 perl에 의존적인 패키지를 설치하기 위해서 필요하다... 이거 안해주면 두고 두고 골치아파진다. 꼭 해주자.
livecd / # emerge -e system :: system을 설치한다.
livecd / # emerge -epv system :: system 파일이 정상적으로 설치가 되었는지 확인
아래의 유틸리티는 필수 유틸리티이며 설치되어 있는지 확인할 것
-------------------------------------------------------------------------------------------
livecd / # emerge sys-apps/util-linux :: mount 등의 필수 유틸 설치
livecd / # emerge sys-apps/shadow :: passwd 설치
livecd / # emerge sys-process/psmisc :: kill
livecd / # emerge sys-apps/module-init-tools :: lsmod 설치
livecd / # emerge sys-process/procps :: ps 설치
livecd / # emerge man :: man 설치
livecd / # USE="-zlib" emerge sys-apps/pciutils ::
-------------------------------------------------------------------------------------------
2.2.컴퓨터 이름 설정
# echo {YourComputerName} > /etc/conf.d/hostname
# echo {YourDomain} > /etc/dnsdomainname
# echo {YourNameServer} > /etc/nisdomainname :: 없으면 생략 또는 hostname 과 동일
2.3.네트워크설정
# nano /etc/conf.d/net
아래는 필자의 네트워크설정이다.
----------------------------------------------------------------------------------
config_eth0=( "192.168.0.180 netmask 255.255.255.0 brd 192.168.0.255" )
routes_eth0=( "default gw 192.168.0.1" )
----------------------------------------------------------------------------------
# rc-update add net.eth0 default :: 컴퓨터 부팅시 자동시작 되도록 설정한다.
시스템 설치 과정을 마치고 나면 스냅샷을 찍어두자.
스냅샷이름: Stage2 완료
3.stage 3 시작
stage3의 목적은 커널 및 부트로더 설치이다.
stage3를 마치고 나면 기본적인 젠투시스템을 가지게 된다.
3.1.시스템 시간 설정
livecd portage # ln -sf /usr/share/zoneinfo/Asia/Seoul /etc/localtime
위의 명령어는 서울을 기준으로 시스템 시간을 설정하는 것이다.
3.2.파티션 정보 설정
livecd portage # nano -w /etc/fstab
아래는 필자의 파티션 정보 설정이며 자신의 시스템에 맞는 파티션 정보를 설정한다. 참고로 boot 파티션의 noauto는 꼭 빼준다.
------------------------------------------------------------------------------------------------------------
proc /proc proc default 0 0
/dev/sda1 /boot ext2 noatime 1 2
/dev/sda3 / ext3 noatime 0 1
/dev/sda2 none swap sw 0 0
/dev/hdc /mnt/cdrom auto noauto,ro 0 0
shm /dev/shm tmpfs nodev,nosuid,noexec 0 0
------------------------------------------------------------------------------------------------------------
3.3.kernel 설치
커널을 설치하는 방법에는 Gentoo전용으로 이미 컴파일된 커널을 설치하는 방법과 kernel.org에서 직접 받아다가 컴파일해서 사용하는 방법 2가지가 있다.
3.3.1.Gentoo 전용 Kernel 설치
livecd portage # emerge gentoo-sources :: 커널을 소스를 받는다. 준비과정을 끝내고 stage3 로 바로 왔을 경우 이 과정이 완료된 상태이다.
livecd portage # emerge genkernel
livecd portage # genkernel all
3.3.2.사용자 Kernel 설치
livecd portage # cd /usr/src
livecd src # wget http://www.kernel.org/pub/linux/kernel/v2.6/linux-2.6.22.tar.bz2
livecd src # tar -xvjf linux-2.6.22.tar.bz2
livecd src # ln -sf linux-2.6.22 linux
livecd src # cd linux
livecd linux # make mrproper :: .config에 설정된 내용을 삭제
livecd linux # make menuconfig :: .config 파일을 편집해주는 GUI, 설정값은 아래를 참고하라.
livecd linux # make clean
livecd linux # make bzImage :: 커널이미지를 만든다.
livecd linux # cp arch/i386/boot/bzImage /boot/bzImage-2.6.22 :: 커널이미지를 부트파티션으로 이동시킨다.
livecd linux # make modules :: 커널에서 사용할 모듈을 만든다.
livecd linux # make modules_install :: 커널에서 사용할 모듈을 설치한다.
-------------------------------------------------------------------------------------------------------------------------
아래는 VMware에 설치할 경우의 커널설정이다.
-------------------------------------------------------------------------------------------------------------------------
Loadable module support --->
+ [*] Enable loadable support
+ [*] Module unloading
+ [*] Automatic kernel module loading
Processor type and features --->
+ Processor family (Core 2/newer Xeon)
+ (2) Maximum number of CPUs (2-255)
+ [*] Symmetric multi-processing support
Device Drivers --->
+ SCSI device support --->
++ <*> SCSI device support
++ <*> SCSI disk support
++ <*> SCSI generic support
++ SCSI Transports
++ SCSI low-level drivers --->
+++ <*> BusLogic SCSI support
+++ [*] Omit FlashPoint support
+ Fusion MPT device support --->
++ <*> Fusion MPT ScsiHost drivers for SPI
++ <*> Fusion MPT ScsiHost drivers for FC
++ <*> Fusion MPT ScsiHost drivers for SAS
++ (128) Maximum number of scatter gather entries (16 - 128)
++ <*> Fusion MPT misc device (ioctl) driver
+ Network device support --->
+ Ethernet (10 or 100Mbit) --->
++ [*]EISA, VLB, PCI and on board controllers
+++ <*> AMD PCnet32 PCI support
+ Sound --->
++ Advanced Linux Sound Architecture --->
+++ <*> Advanced Linux sound Architecture
+++ <*> OSS Mixer API
+++ <*> OSS PCM (digital audio) API
++++ PCI devices --->
+++++ <*> (Creative) Ensoniq AudioPCI 1371/1373
File systems --->
+ DOS/FAT/NT Filesystems --->
++ (949) Default codepage for FAT
++ (EUC-KR) Default iocharset for FAT
++ <*> NTFS file system support
++ [*] NTFS debugging support
++ [*] NTFS write support
+ Native Language Support --->
++ (EUC-KR) Default NLS Option
++ <*> Codepage 437 (United States, Canada)
++ <*> Korean charset (CP949, EUC-KR)
++ <*> NLS ISO 8859-1 (Latin 1; Western European Languages)
++ <*> NLS UTF8
-------------------------------------------------------------------------------------------------------------------------
3.3.3.Kernel Panic
커널패닉의 원인은 딱 3가지다.
1. 잘못된 커널 설정으로 커널컴파일
2. 부트로더가 설정파일
3. /etc/fstab
아래는 대표적인 커널패닉의 예이다.
-------------------------------------------------------------------------------------------------------------------------
Kernel Panic 1
-------------------------------------------------------------------------------------------------------------------------
메시지
VFS: Unable to mount root fs via NFS, trying floppy
VFS: Insert root floppy and press ENTER
원인
grub/grub.conf 설정이 잘못되어 있다. 특히 root=
해결책
grub/grub.conf 를 정확하게 설정한다.
-------------------------------------------------------------------------------------------------------------------------
Kernel Panic 2
-------------------------------------------------------------------------------------------------------------------------
메시지
Kernel panic - not syscing: VFS : Unable to mount root fs on unknown-block(0,0)
원인
리눅스가 부팅시SCSI 방식 의 하드 디스크를 마운트하지 못하는 것이다.
해결책
SCSI 방식의 하드 디스크상에서 부팅 할 수 있도록 커널 컴파일 환경을 설정한다.
3.4.필수 패키지 설치
3.4.1.SSH Daemon 설치
livecd linux #emerge openssh
livecd linux #rc-update add sshd default
3.4.2.Log Daemon 설치
livecd linux #emerge app-admin/syslog-ng
livecd linux #rc-update add syslog-ng default
3.4.3.Cron Daemon 설치
livecd linux #emerge vixie-cron
livecd linux #rc-update add vixie-cron default
vixie-cron, fcron, dcron 중의 하나를 설치할 수 있다.
3.4.4.reiserfsprogs 설치
livecd linux #emerge reiserfsprogs
3.4.5.Hotplug 설치
livecd linux # emerge -k hotplug
livecd linux # rc-update add hotplug default
3.4.6.vim 설치
livecd linux # emerge -k vim
--------------------------------------------------------
에러 메시지
Can't open perl script "/usr/lib/perl5/5.8.8/ExtUtils/xsubpp"
해결책
livecd linux # USE="-perl -libperl" emerge vim
--------------------------------------------------------
3.5.사용자 설정
3.5.1.root 패스워드 설정
#passwd
3.5.2.일반 사용자 추가
# adduser {MyUser} -m -d /home/{MyUser} -G users,wheel,audio -s /bin/bash
# passwd {MyUser}
3.6.Bootloader 설치
3.7.1.lilo 설치
3.7.2.grub설치
# emerge grub
grub> quit
# grub :: grub모드로 진입
grub> root (hd0,0) :: boot 파티션 설정하기 , hd0 = 0번째 하드디스크, 0 = 첫번째 파티션
grub> setup (hd0) :: MBR이 올라갈 곳을 지정한다.
grub> quit
# nano /boot/grub/grub.conf
아래와 같이 편집
------------------------------------------------------------------------------
default 0
timeout 30
#background image
splashimage=(hd0,0)/boot/grub/splash.xpm.gz
title=Gentoo Linux (2.6.22)
root (hd0,0)
kernel /bzImage-2.6.22 root=/dev/sda3
------------------------------------------------------------------------------
커널 및 부트로더 설치 과정을 마치고 나면 스냅샷을 찍어두자.
스냅샷이름: Stage3 완료
3.8.재부팅
# etc-update
# exit :: chroot 빠져나오기
livecd gentoo # cd /
livecd / # umount /mnt/gentoo/boot
livecd / # umount /mnt/gentoo/proc
livecd / # umount /mnt/gentoo
livecd / # reboot
이제 여러분은 해야할 일이 아직 많이 남은 뼈대만 있는 젠투 시스템(bare bone)을 가지게 되었다.
4.stage 4 시작
stage4의 목적은 뻐대만 있는 젠투 시스템을 그래픽 데스크탑 환경으로 만드는데 있습니다.
4.1.X-window설치
4.1.1.X Server 설치
{YourServerName} ~ # emerge xorg-x11 :: X-Server 설치
{YourServerName} ~ # env-update :: Update the system variables
{YourServerName} ~ # source /etc/profile
{YourServerName} ~ # Xorg -configure :: 자동으로 하드웨어 설정을 검색하고 root 홈 디렉토리에 xorg.conf.new 파일을 생성 (ssh 접속 끊어짐)
{YourServerName} ~ # X -config /root/xorg.conf.new :: Xorg -configure가 자동으로 잡아준 설정을 테스트
{YourServerName} ~ # mv /root/xorg.conf.new /etc/X11/xorg.conf :: X-Server 설정파일을 원래 위치로 이동
{YourServerName} ~ # startx :: X-Server 시작
X -config /root/xorg.conf.new를 실행하면 바둑판 무늬 배경에 마우스 커서만 보이는데 마우스가 잘 동작하는지 화면 해상도는 제대로 잡혔는지 확인하고 제대로 되었다 싶으시면 설정파일을 기본 위치로 복사해 준다.
원하는 설정이 제대로 나오지 않는다면 설정파일(/root/xorg.conf.new)을 직접 수정하거나 xorgcfg 혹은 xorgconfig 명령으로 수동설정해준다.
4.1.1.마우스 프리
#emerge x11-drivers/xf86-input-vmmouse
#vi /etc/X11/xorg.conf :: 아래의 설정으로변경 (마우스가 vmware를 빠져나올때 ctrl+alt를 클릭할 필요가 없게된다)
-----------------------------------------------------------
Section "InputDevice"
Identifier "Mouse0"
Driver "vmmouse"
Option "Protocol" "auto"
Option "Device" "/dev/input/mouse0"
Option "ZAxisMapping" "4 5 6 7"
EndSection
-----------------------------------------------------------
4.2.Desktop environment
4.2.1.Gnome
GNU에서 만들고 있는 리눅스용 데스크탑 환경이다.
{YourServerName} ~ # USE="gnome gtk gtk2 -kde -qt -arts" emerge gnome :: gnome 설치
{YourServerName} ~ # emerge xscreensaver :: gnome
{YourServerName} ~ # emerge gdm :: Gnome Desktop Manager
{YourServerName} ~ # vi /etc/rc.conf :: 실행되기위한 설정
------------------------------------------
DISPLAYMANAGER="gdm"
XESSION="Gnome"
-----------------------------------------
{YourServerName} ~ # rc-update add xdm default
{YourServerName} ~ # /usr/X11R6/bin/XFree86 -scanpci
{YourServerName} ~ # /usr/X11R6/bin/XFree86 -configure
{YourServerName} ~ # cp /root/XF86Config.new /etc/X11/XF86Config
4.2.2.KDE
4.3.vmware-tool 설치
4.3.1.임시폴더 생성
# cd /etc/init.d :: 없을 경우 mkdir /etc/init.d
# for i in {0,1,2,3,4,5,6}; do mkdir rc$i.d; done
----------------------------------------------------------------------------------------------------------------------
4.3.2.프로그램 마운트
VM menu > Install VMware Tools :: VMware Tools 가 CD-ROM에 삽입된다.
# mount /dev/hdc /mnt/cdrom :: CD-ROM을 마운트한다.
# cp /mnt/cdrom/VMwareTools-x.x.x-xxxxx.tar.gz /root/VMwareTools.tar.gz
# cd /root
# tar -xvzf VMwareTools.tar.gz
# cd vmware-tools-distrib
4.3.3.설치프로그램 시작
# ./vmware-install.pl
아래는 vmware-install 모드이다.
----------------------------------------------------------------------------------------------------------------------
Installing VMware Tools.
In which directory do you want to install the binary files?
[/usr/bin]
What is the directory that contains the init directories (rc0.d/ to
rc6.d/)? /etc/init.d/
What is the directory that contains the init scripts?
[/etc/init.d]
In which directory do you want to install the daemon files?
[/usr/sbin]
In which directory do you want to install the library files?
[/usr/lib/vmware-tools]
The path "/usr/lib/vmware-tools" does not exist currently. This program is
going to create it, including needed parent directories. Is this what you want?
[yes]
In which directory do you want to install the documentation files?
[/usr/share/doc/vmware-tools]
The path "/usr/share/doc/vmware-tools" does not exist currently. This program
is going to create it, including needed parent directories. Is this what you
want? [yes]
The installation of VMware Tools 6.0.2 build-59824 for Linux completed
successfully. You can decide to remove this software from your system at any
time by invoking the following command: "/usr/bin/vmware-uninstall-tools.pl".
Before running VMware Tools for the first time, you need to configure it by
invoking the following command: "/usr/bin/vmware-config-tools.pl". Do you want
this program to invoke the command for you now? [yes]
----------------------------------------------------------------------------------------------------------------------
4.3.4.환경설정 시작
# cp /root/vmware-tools-distrib/bin/vmware-config-tools.pl /usr/local/bin/vmware-config-tools.pl
# /usr/local/bin/vmware-config-tools.pl --compile
4.3.5.부팅 후 적용
# rc-update add vmware-tools boot
4.3.6.임시폴더 삭제
# cd /etc/init.d
# for i in {0,1,2,3,4,5,6}; do rm -rf rc$i.d; done
4.4.한글설정
4.4.1.한글 글꼴 설치
# emerge unfonts :: 은폰트 설치
# emerge unfonts-extra
# emerge alee-fonts :: 은진체 설치
# fc-cache
4.4.2.한글 입력기 설치
요즘은 대부분 scim 을 사용하지만, 가끔은 불안한거 같아 나비를 설치하였습니다.
# emerge nabi
그놈 메뉴 - 데스크탑 - 기본설정 - 세션 - 시작프로그램에러 아래를 추가
---------------------------------------------------------------------------
이름: nabi
프로그램: /usr/bin/nabi 을 추가합니다.
---------------------------------------------------------------------------
4.4.3.한글 입력기(nabi) 설정
4.4.3.1. /etc/env.d/00basic
# vi /etc/env.d/00basic
아래의 내용을 추가
---------------------------------------------------
#locale
LANG="ko_KR.eucKR"
LC_ALL="ko_KR.eucKR"
SUPPORTED="ko_KR.eucKR:ko_KR:ko"
SYSFONT="lat0-sun16"
SYSFONTACM="iso01" ( iso에서 o는 알파벳이고 01은 숫자 01이다. )
#nabi for xim
XMODIFIERS="@im=nabi"
XIM_PROGRAM="/usr/bin/nabi"
GTK_IM_MODULE="XIM"
---------------------------------------------------
4.4.3.2./etc/env.d/02locale
# vi /etc/env.d/02locale
아래의 내용을 추가
---------------------------------------------------
#locale
LANG="ko_KR.eucKR"
LC_ALL="ko_KR.eucKR"
#nabi for xim
XMODIFIERS="@im=nabi"
XIM_PROGRAM="/usr/local/bin/nabi"
GTK_IM_MODULE="hangul 2"
G_BROKEN_FILENAMES="1"
---------------------------------------------------
4.4.3.3./etc/profile
# vi /etc/profile
아래의 내용을 추가
---------------------------------------------------------
export LANG=ko_KR.eucKR
export LC_ALL=ko_KR.eucKR
---------------------------------------------------------
4.4.3.4./etc/locale.gen
# vi /etc/locale.gen ::일단 "#en_US ISO-8859-1" , "#en_US.UTF-8 UTF-8"의 #을 제거하자~! ( 둘다 ~ )
아래의 내용을 추가
--------------------------------------------------------
ko_KR.EUC-KR EUC-KR
ko_KR.UTF-8 UTF-8
ko_KR EUC-KR
---------------------------------------------------------
4.4.3.5.gtkrc-2.0
# vi .gtkrc-2.0
아래의 내용을 추가
----------------------------------------------------------
style "user-font"
{
fontset="-adobe-helvetica-medium-nermal-*-12-*-*-*-*-*-iso8859-1,-*-gulim-medium-r-normal-*-12-*-*-*-*-*-ksc5601.1987-0"
}
widget_class "*" style "user-font"
gtk-im-hangul-status-window=1
------------------------------------------------------------
4.4.3.6.환경재설정
# env-update
4.4.4.한영키, 한자키 등록
# vi /etc/X11/Xmodmap
아래의 내용을 추가, 아래는 제 노트북 keycode 값이다. xev로 각자의 keycode값을 확인하시오.
---------------------------------------------------
keycode 109 = Hangul_Hanja
keycode 113 = Hangul
---------------------------------------------------
지금까지 잘 따라와 주었다. 이제 당신앞에는 젠투 세상이 펼쳐져있다.
이제 부터는 자신에게 필요한 어플리케이션을 스스로 찾아서 설치해보기 바란다.
당신에게 man과 emerge의 가호가 함께 하기를...
vmware-tool의 설치 과정을 마치고 나면 스냅샷을 찍어두자.
스냅샷이름: Stage4 완료
| Visual Studio 단축키 (0) | 2010.03.18 |
|---|---|
| 증분링크 (0) | 2010.03.18 |
| 윈도우 가상 드라이버 생성 (0) | 2010.03.18 |
| WSS / MOSS Sp2 설치 (1) | 2010.03.18 |
| MOSS Content Library의 받는 메일 설정 (0) | 2010.03.18 |
드디어 Windows SharePoint Services 3.0/Microsoft Office servers
의 Service Pack 2가 Release 되었습니다. 다운로드 경로는 아래에 별도로 정리해 놓았으며, SP2 적용을 위해 몇 가지 주의 사항을 정리해 보겠습니다.
[Package 다운로드 경로]
List of all 2007 Office system Service Pack 2 and Windows SharePoint Services 3.0 Service Pack 2 packages
http://support.microsoft.com/kb/968170
1. Windows SharePoint Services 3.0 products
2. Office server products
[추가정보]
다음은 SP2 적용시 알려진 문제점에 대한 KB문서입니다.
- Known issues that you may experience when you install the 2007 Microsoft Office suite Service Pack 2 and Windows SharePoint Services 3.0 Service Pack 2
http://support.microsoft.com/kb/968173/
954713 (http://support.microsoft.com/kb/954713/ ) How to investigate and resolve update installation failures for the 2007 Office system or for Windows SharePoint Services 3.0
943589 (http://support.microsoft.com/kb/943589/ ) Error message when you try to upgrade 2007 Office programs, Expression Web or Windows SharePoint Services 3.0 to the Service Pack 1 level if the Windows system drive has insufficient free disk space: "The installation of this package failed"
942101 (http://support.microsoft.com/kb/942101/ ) You receive an error message when you try to apply any of the 2007 Office Service Pack 1 packages on a computer that is running Windows XP Service Pack 2
942995 (http://support.microsoft.com/kb/942995/ ) You are prompted unexpectedly to restart the computer after you install a 2007 Office service pack or a 2007 Office update
967642 (http://support.microsoft.com/kb/967642/ ) You receive an error message when you try to install the 2007 Microsoft Office suite service packs
-posted by kn
Filed under: sharepoint update
| Visual Studio 단축키 (0) | 2010.03.18 |
|---|---|
| 증분링크 (0) | 2010.03.18 |
| 윈도우 가상 드라이버 생성 (0) | 2010.03.18 |
| Gentoo Linux 설치 (0) | 2010.03.18 |
| MOSS Content Library의 받는 메일 설정 (0) | 2010.03.18 |
MOSS에는 E-Mail을 Content Library( 문서, 이미지, etc )별로 연착처를 생성하여 그 email로 들어오는 메일을 해당 ContentLibrary에 리스트업할 수 있다.
예를 들어 PROCESS_TODOLIST 라는 문서라이브러리가 있을 때, 받는 메일을 proctodolist@xxx.co.kr 이라고 설정하면, proctodolist로 보내진 메일이 PROCESS_TODOLIST에 쌓이는 기능이다.
방법.
0. 아래 방법은 직접 사용하고 있는 방법이고, 환경은 ActiveDirectory 를 사용하며,
MOSS2007 서버, Exchange 2007 서버가 별도 설치 되어 있다.
1. 우선 WSS에 받는 메일 설정을 해줘야한다.
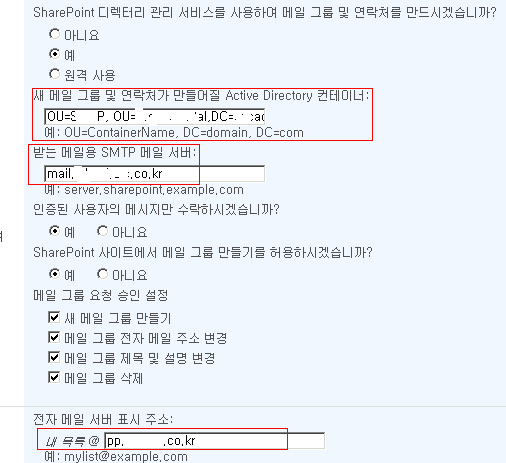
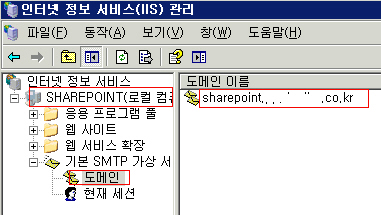
아래와 같이 Active Directofy Container를 설정하고, SMTP 메일 서버를 설정한다.
이부분에 대한 자세한 내용은 이 블로그에 나와있다..
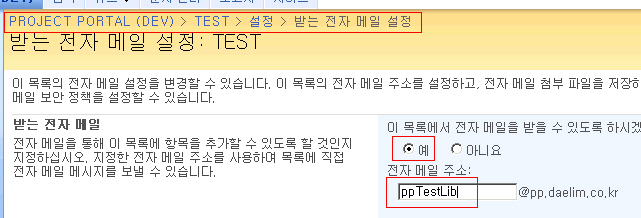
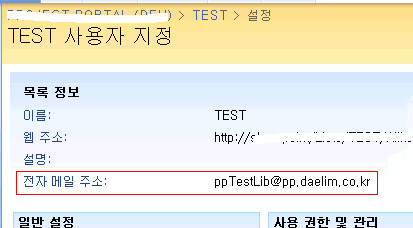
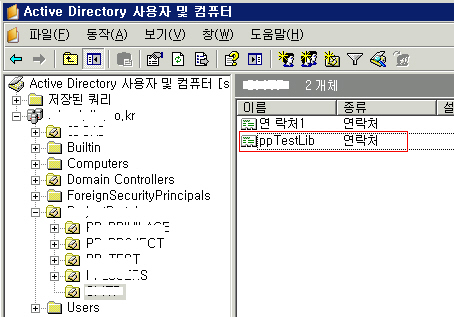
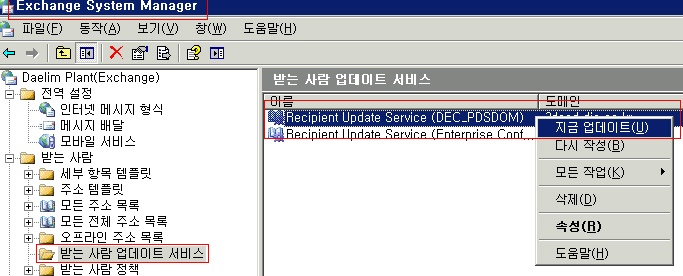
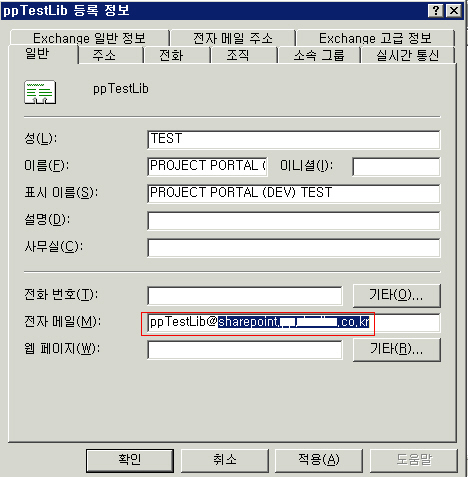
6. 이제 ppTestLib의 등록정보를 확인해보자. 전자메일 부분이 Exchange 메일주소로 되어 잇는데, WSS의 Lib에 연결하기 위해서는 WSS Server의 가상 SMTP 주소를 입력해 줘야한다.
그러므로 전자메일 주소를 WSS Server의 SMTP 도메인 이름으로 변경하고 적용을 클릭한다.
참고로, SMTP가상 서버란, 특정 EMAIL 주소로 보내진 EMAIL을 SMTP가상서버가 받을때 사용한다. 예를 들어 인트라넷 전용 EMAIL이 있는데, 외부 email 주소로 보내고 싶다면, 이메일 설정에 외부 SMTP를 등록해주면 된다.
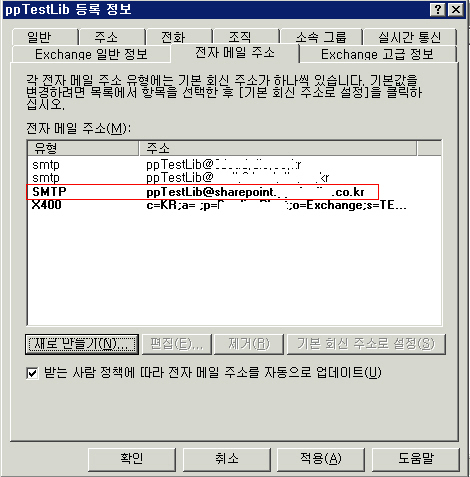
WSS에서는 ppTestLib@exchange.co.kr로 보내진 메일을 ppTestLib@sharepoint.exchange.co.kr로 넘기게 되고, WSS는 SMTP 가상서버( sharepoint.exchange.co.kr )을 통하여 email을 받아 Lib에 등록하게 되는 것이다.
7. 전자메일주소 탭을 가보면 아래와 같이 수정한 smtp 가상서버가 등록된 것을 알 수 있다.
참고로, 진하게 표시된 SMTP가 기본 회신 주소가 되는 것이다. 즉, WSS Server의 SMTP로 메일이 보내진다.
이제 모든 작업이 끝났다. 이메일을 보내보고(ppTestLib@exchange.co.kr) 문서라이브러리로 가서
받은 이메일 내용이 쌓이는지 확인해보자..
만약 여기까지 왔는데, 안된다면, SMTP와 ppTestLib 연락처의 email설정이 안맞아서 그런 것일 가능성이 크다.
[출처] MOSS Content Library의 받는 메일 설정|작성자 미래청년
| Visual Studio 단축키 (0) | 2010.03.18 |
|---|---|
| 증분링크 (0) | 2010.03.18 |
| 윈도우 가상 드라이버 생성 (0) | 2010.03.18 |
| Gentoo Linux 설치 (0) | 2010.03.18 |
| WSS / MOSS Sp2 설치 (1) | 2010.03.18 |
_WIN32_WINNT, WINVER 값
Windows "Longhorn" 0x0600 <= 이게 비스타인듯~
Windows Server 2003 0x0502
Windows XP 0x0501
Windows 2000 0x0500
Windows 98 0x0410
Windows 95 0x0400
_WIN32_IE 값
IE 7.0 0x0700
IE 6.0 SP2 0x0603
IE 6.0 SP1 0x0601
IE 6.0 0x0600
IE 5.5 0x0550
IE 5.01 0x0501
IE 5.0 5.0a 5.0b 0x0500
IE 4.01 0x0401
IE 4.0 0x0400
IE 3.0 3.01 3.02 0x0300
-----------------< 추가 내용 >-----------------
알아두면 좋을거 같은 매크로들 몇 개 (MSDN)
ANSI 호환 매크로들
__DATE__ 매크로가 사용된 파일이 컴파일 된 시간
__FILE__ 매크로가 사용된 파일의 이름
__LINE__ 매크로가 사용된 파일에서 매크로가 있는 곳의 라인 넘버
__STDC__ ANSI C 표준에 준하는지 확인. /Za옵션이 없거나 C++코드 컴파일 하면 정의 안됨
__TIME__ 매크로가 사용된 파일의 가장 최근에 컴파일 된 시간
__TIMESTAMP__ 매크로가 사용된 파일의 최종 수정된 시간
Microsoft 에서만 사용되는 매크로들
_ATL_VER ATL 버전
_CHAR_UNSIGNED char타입을 unsigned로 함. /J 옵션 주면 정의 됨
__CLR_VER Common Language Runtime 버전
__cplusplus_cli /clr, /clr:pure, /clr:safe 옵션 주면 정의.
__COUNTER__ 빌드 할때마다 1씩 증가하는 매크로. PCH에 저장됨.
__cplusplus C++사용할 때 정의 됨
_CPPLIB_VER C++ 표준 라이브러리 버전
_CPPRTTI RTTI 사용하면 정의 됨
_CPPUNWIND 예외 처리 사용하면 정의 됨
_DEBUG 디버그 모드 (/LDd, /MDd, /MTd 옵션 주면 됨)
_DLL 다중 쓰레드 버전의 DLL(/MD, /MDd 옵션)사용할 때 정의
__FUNCDNAME__ 매크로가 사용된 함수의 decorated name (/EP나 /P옵션이 없어야 함)
__FUNCSIG__ 매크로가 사용된 함수의 signature (/EP나 /P옵션이 없어야 함)
__FUNCTION__ 매크로가 사용된 함수의 이름 (/EP나 /P옵션이 없어야 함)
아~ 귀찮어, 졸려, 담배 땡겨, 배불러, 안해. 나머진 MSDN의 Predefined Macros 항목에서 찾아보슈.
_INTEGRAL_MAX_BITS
_M_ALPHA
_M_CEE
_M_CEE_PURE
_M_CEE_SAFE
_M_IX86
_M_IA64
_M_IX86_FP
_M_MPPC
_M_MRX00
_M_PPC
_M_X64
_MANAGED
_MFC_VER
_MSC_EXTENSIONS
_MSC_VER
__MSVC_RUNTIME_CHECKS
_MT
_NATIVE_WCHAR_T_DEFINED
_OPENMP
_VC_NODEFAULTLIB
_WCHAR_T_DEFINED
_WIN32
_WIN64
_Wp64
| Deadlock 4가지 조건 (0) | 2010.03.19 |
|---|---|
| Synchronization Function (0) | 2010.03.19 |
| 사용법 (0) | 2010.03.18 |
| LoadLibrary (0) | 2010.03.18 |
| Hooking (0) | 2010.03.18 |
헐... 예전에 설정 더 해놨었는디..... 어디 간겨ㅠㅠㅠㅠ
이것밖에 없어....ㅋㅋㅋㅋㅋㅋㅋ;;;;;;;;;
1. download the Professor Irvine's assembly source file
2. project.sln open in the \Irvine\Examples\Project_sample
3. 'F7' push compile to Irvine's assembly sourcve
syntax highlighting
1. download the "usertype.dat"
2. copy to "\Program Files\Microsoft Visual Studio 9.0\Common7\IDE"
3. visual studio restart
reference
http://kipirvine.com/asm/gettingStarted/index.htm
| IIS, FTP 설치 (0) | 2010.03.19 |
|---|---|
| VS2008로 작성한 프로젝트를 VS2005열기 (0) | 2010.03.18 |
| NSIS 값 읽어오기 (0) | 2010.03.18 |
| NSIS 기초지식 (0) | 2010.03.18 |
| 같은 페이지에 계속 머무르기 (0) | 2010.03.18 |
netioapi.h의 #include <ntddndis.h> 이 부분을
#include "ntddndis.h" 로 바꾼다
| 고수님들.. (0) | 2011.12.15 |
|---|---|
| 옴니아 햅틱(진동) 프로그램 (0) | 2010.04.05 |
| 패킷 만들기 (0) | 2010.03.18 |
| 고수님들.. (0) | 2011.12.15 |
|---|---|
| 옴니아 햅틱(진동) 프로그램 (0) | 2010.04.05 |
| C2146 구문오류 (0) | 2010.03.18 |
파일 다운로드!:: SQL_Lite.zip
CppSQLite3DB dbConnection;
try
{
dbConnection.open("UserList.db3");
int nRows = dbConnection.execDML("insert into userinfo values ('한효주', '한국');");
cout << nRows << " rows inserted" << endl;
CppSQLite3Query q = dbConnection.execQuery("select * from userinfo;");
for (int fld = 0; fld < q.numFields(); fld++)
{
cout << q.fieldName(fld) << "(" << q.fieldDataType(fld) << ")|";
}
cout << endl;
while (!q.eof())
{
cout << q.fieldValue(0) << "|";
cout << q.fieldValue(1) << "|" << endl;
q.nextRow();
}
nRows = dbConnection.execDML("delete from userinfo where user_name = '한효주';");
cout << nRows << " rows deleted" << endl;
}
catch (CppSQLite3Exception& e)
{
cerr << e.errorCode() << ":" << e.errorMessage() << endl;
}
[출처] SQLite 발만 담가보기|작성자 사랑한톨
| SQL Query (0) | 2010.03.18 |
|---|---|
| SqlConnection (0) | 2010.03.18 |
| SqlCommand (0) | 2010.03.18 |
CppSQLite3DB m_DB;
char query[ 255 ];
try
{
m_DB.open( "c:\aaa.db" ); // 데이터 베이스 열기
m_DB.execDML( "create table Tcp(num int, SrcAddr char(16), DstAddr char(16), SrcPort int, DstPort int, TcpLen int, Time char(20)) " );
// 테이블 생성
sprintf( query, "insert tcp values( %d, 'aaa', 'bbb', 10, 20, 30, '%d시간' );", i, 30 ); // 입력 쿼리문 생성
m_DB.execDML( query ); // 쿼리 실행
}
데이터 읽기
CppSQLite3Query q = m_DB.execQuery( "select * from Tcp;" );
while( !q.eof() )
{
data[ 0 ] = const_cast< char* >( q.fieldValue( 0 ) );
data[ 1 ] = const_cast< char* >( q.fieldValue( 1 ) );
data[ 2 ] = const_cast< char* >( q.fieldValue( 2 ) );
data[ 3 ] = const_cast< char* >( q.fieldValue( 3 ) );
data[ 4 ] = const_cast< char* >( q.fieldValue( 4 ) );
data[ 5 ] = const_cast< char* >( q.fieldValue( 5 ) );
data[ 6 ] = const_cast< char* >( q.fieldValue( 6 ) );
q.nextRow();
}
| Synchronization Function (0) | 2010.03.19 |
|---|---|
| Win Version & Macro (0) | 2010.03.18 |
| LoadLibrary (0) | 2010.03.18 |
| Hooking (0) | 2010.03.18 |
| 윈도우 핸들 얻기 (0) | 2010.03.18 |
Algorithm
#include <algorithm>
sort( b, e ) // 범위 [b, e]에 의해 정의되는 요소들을 재 정렬시킨다.
max( b, e ) // b와 e중 더 큰 값을 리턴시킨다.
min( b, e ) // b와 e중 더 작은은 값을 리턴시킨다.
| STL find()와 sort() 사용하기 (0) | 2010.07.27 |
|---|---|
| list (0) | 2010.03.18 |
| Sequential Container (0) | 2010.03.18 |
| stl C++ Exception Class (0) | 2010.03.18 |
| String (0) | 2010.03.18 |
list
#include <list>
list<Student_info> extract_fails( list<Student_info>& students )
{
list<Student_info> fail;
list<Student_info>::iterator iter = students.begin();
while( iter != students.end() )
{
if( fgrade( *iter) )
{
fail.push_back( *iter );
iter = students.erase( iter );
}
else
++iter;
}
return fail;
}
list sort 함수
list<Student_info> students;
students.sort( compare );
list<int> l;
l.sort(), l.sort( cmp ) // list 의 타입에 대한 < 연산자를 사용하거나, cmp 함수를 사용하여 l의 요소들을 정렬합니다.
// 반복자 미 사용
for( list<Student_info>::size_type i = 0; i != students.size(); ++i )
cout << students[ i ].name << endl;
// 반복자 iterator 사용
for( list<Student_info>::const_iterator iter = students.begin(); iter != students.end(); ++iter )
cout << iter->name << endl;
| STL find()와 sort() 사용하기 (0) | 2010.07.27 |
|---|---|
| Algorithm (0) | 2010.03.18 |
| Sequential Container (0) | 2010.03.18 |
| stl C++ Exception Class (0) | 2010.03.18 |
| String (0) | 2010.03.18 |
모든 순차 컨테이너들과 string 타입은 다음과 같은 연산들을 제공한다.
container<T>::iterator
container<T>::const_iterator // 이 컨테이너에 대한 반복자의 타입명
container<T>::size_type // 이 컨테이너의 인스턴스가 가질 수 있는 최대 사이즈 갑을 저장할 수 있는 타입의 이름
c.begin()
c.end() // 컨테이너의 첫 번째 및 마지막 요소를 가리키는 반복자
c.rbegin()
c.rend() // 컨테이너의 요소를 역순으로 접근할 수 있도록 컨테이너의 마지막 및 (하나 이전의) 첫 번째 요소를 가리키는 반복자
container<T> c();
container<T> c( c2 ); // 빈 컨테이너로서의 c를 정의하거나, 만약 주어진다면, c2의 복사본으로서의 c를 정의합니다.
container<T> c( n ); // T의 타입에 따라 값지정-초기화된 n개의 요소들을 갖는 컨테이너로서의 c를 정의합니다. 만약 T가 클래스 타입이라면, 이 클래스 타입에 따라 요소들이 어떻게 초기화될 것인지가 결정됩니다. 만약 T가 내장된 연산 타입이라면, 요소들은 0으로 초기화 됩니다.
container<T> c( n, t ); // t의 복사본인 n 개의 요소들을 갖는 컨테이너로서의 c를 정의합니다.
container<T> c( b, e ); // b, e 범위의 반복자로 얻어진 요소들의 복사본을 담는 컨테이너를 생성합니다.
c = c2 // 컨테이너 c의 내용을 컨테이너 c2의 복사본으로 변경합니다.
c.size() c의 요소들의 개수를 size_type 으로 리턴합니다.
c.empty() c에 요소가 하나도 없는지 알려주는 함수
c.insert( d, b, e ) // b, e 범위의 반복자가 가리키는 요소들을 복사해서 d 바로 앞에 삽입시킨다.
c.erase( iterator )
c.erase( b, e ) // 컨테이너 c로부터 iterator가 기리키는 요소, 또는 (b, e ) 가 나타내는 범위의 요소들을 삭제한다. 이 연산은 list에 대해서는 빠르지만, vector 및 string에 대해서는 느릴 수 있습니다. 왜냐하면, 이러한 타입에 대해서는 삭제된 요소 다음에 있는 모든 요소들을 복사하는 작업이 필요하기 때문입니다. list에 대해서는 삭제된 요소에 대한 반복자들만 무효화되지만, vector와 string에 대해서는 삭제된 요소의 다음에 위치한 요소들을 가리키는 모든 반복자들이 무효화 됩니다.
c.push_back(t) // c의 끝을 가리키는 요소에 값 t를 추가합니다.
임의 접근을 지원하는 컨테이너들과 string 타입은 다음의 기능을 제공합니다.
c[n] // 컨테이너 c로부터 n의 위치에 있는 문자를 얻습니다.
반복자 연산
*it // 반복자 iterator를 역참조하여 iterator가 가리키는 위치에 저장된 값을 얻습니다. 이 연산은 보통 it->x 로 사용이됩니다.
++it, it++ 반복자를 증가시켜 컨테이너의 다음 요소를 가리키게 합니다.
b == e, b != e // 두 반복자가 동일한지, 동일하지 않은지 비교합니다.
| Algorithm (0) | 2010.03.18 |
|---|---|
| list (0) | 2010.03.18 |
| stl C++ Exception Class (0) | 2010.03.18 |
| String (0) | 2010.03.18 |
| Vector (0) | 2010.03.18 |
logic_error
domain_error
invalid_argument
length_error
out_of_range
runtime_error
range_error
overflow_error
underflow_error
e.what() 오류를 발생시킨 것이 무엇인지를 설명하는 값을 리턴합니다.
| Algorithm (0) | 2010.03.18 |
|---|---|
| list (0) | 2010.03.18 |
| Sequential Container (0) | 2010.03.18 |
| String (0) | 2010.03.18 |
| Vector (0) | 2010.03.18 |
String
#include <string>
s1 < s2 string 인 s1과 s2를 사전 검색 순서로 비교합니다.
s.width( n ) 다음 번 출력에서( n이 생력되면 변화 없음), 스트림 s의 넓이를 n으로 설정합니다. 출력의 오른쪽에 주어진 넓이만큼의 공백이 덧붙여집니다. 이전 넓이를 리턴합니다. 표준 출력 연산자는 기존의 넓이 값을 사용하며, width(0)를 사용하면 넓이를 리셋시킵니다.
s.substr( i, j ) // ( i ~ i + j ) 범위의 인덱스에 해당하는 s의 문자들을 복사하여 새로운 string을 생성합니다.
getline( is, s ) // is로부터 한 라인의 입력을 받아들여 s에 저장합니다.
s += s2 // s를 s + s2의 값으로 변경합니다.
| Algorithm (0) | 2010.03.18 |
|---|---|
| list (0) | 2010.03.18 |
| Sequential Container (0) | 2010.03.18 |
| stl C++ Exception Class (0) | 2010.03.18 |
| Vector (0) | 2010.03.18 |
Vector
#include <vector>
// 벡터는 임의 접근에 대해 최적화되어 있다. 최적화의 대가로, 벡터의 끝이 아닌 다른 위치에 요소를 삽입하고 삭제하는 작업은 매우 느리다.
vector<int> vec_int; // int 형의 빈 vector 생성
vec_int.begin() // vec_int의 첫 번째 요소를 나타내는 값을 리턴
vec_int.end() // vec_int의 마지막 요소를 나타내는 값을 리턴
vec_int.push_back( e ) // vector에 e로 초기화된 요소 하나를 추가
vec_int[ i ] // i 위치에 저장된 값을 리턴
vec_int.size() // vec_int 에 들어있는 요소들의 개수를 리턴
vec_int.erase( vec_int.begin() + i ) // 시작위치부터 i번째 떨어져 있는 값을 지움
반복자
// 반복자 미 사용
for( vector<Student_info>::size_type i = 0; i != students.size(); ++i )
cout << students[ i ].name << endl;
// 반복자 iterator 사용
for( vector<Student_info>::const_iterator iter = students.begin(); iter != students.end(); ++iter )
cout << ( iter->name << endl;
v.reserve( n ) // n 개의 요소를 담을 수 있는 공간을 확보합니다. 하지만, 초기화하지 않습니다. 이 연산은 컨테이너의 크기를 변화시키지는 않습니다. 단지 반복적인 insert나 push_back으로 인한 빈번한 메모리 할당을 막기 위해서 사용합니다.
v.resize( n ) // v의 사이즈를 n이 되도록 만듭니다. 만약 n이 현재 v의 사이즈보다 작다면, n 이하의 요소들은 vector에서 제거됩니다. 만약 n이 현재 사이즈보다 크다면, 새로운 요소들이 v에 추가되고 v의 타입에 의해 적당한 값으로 초기화 됩니다.
| Algorithm (0) | 2010.03.18 |
|---|---|
| list (0) | 2010.03.18 |
| Sequential Container (0) | 2010.03.18 |
| stl C++ Exception Class (0) | 2010.03.18 |
| String (0) | 2010.03.18 |
| D-H,appy :: MFC list control 사용 (2) | 2010.07.28 |
|---|---|
| MySQL C++, MFC에서 사용하기 (0) | 2010.06.17 |
| Font 바꾸기 (0) | 2010.03.18 |
| CFile (0) | 2010.03.18 |
| Modal Vs Modless (0) | 2010.03.18 |
CFont font; //CFont object 확보
font.CreateFont( // object의 생성
20, // 문자 폭
20, // 문자 높이
0, // 기울기 각도
0, // 문자 방향
FW_HEAVY, // 문자 굵기
FALSE, // 문자 기울림 모양
FALSE, // 밑 줄
FALSE, // 취소선
DEFAULT_CHARSET, // 문자 셋
OUT_DEFAULT_PRECIS, // 출력 정확도
CLIP_DEFAULT_PRECIS, // 킬립핑 정확도
DEFAULT_QUALITY, // 출력의 질
DEFAULT_PITCH, // 자간 거리
"궁서" // 문자 모양
);
pDC->SelectObject(&font); //pDC에 font 등록
pDC->SetTextColor(RGB(0,0,255));
pDC->TextOut(100,200,"청산은 나를 보고 말없이 살라하고");
pDC->TextOut(100,250,"창공은 나를 보고 티없이 살라하네");
pDC->TextOut(100,300,"사랑도 벗어놓고 미움도 벗어놓고");
pDC->TextOut(100,350,"물처럼 바람처럼 살다 가라하네");
font.DeleteObject(); //font 삭제
| MySQL C++, MFC에서 사용하기 (0) | 2010.06.17 |
|---|---|
| CDC 글 쓰기 (0) | 2010.03.18 |
| CFile (0) | 2010.03.18 |
| Modal Vs Modless (0) | 2010.03.18 |
| Process 강제 종료 막기 (0) | 2010.03.18 |
file.Open( "Data.txt", CFile::modeWrite | CFile::modeCreate | CFile::typeBinary );
file.Write( "BackupData\n", 13 );
for( int i = 0; i < m_FolderBackupList.GetCount(); i ++ )
{
csBuffer = m_FolderBackupList.GetAt( i );
file.Write( csBuffer, csBuffer.GetLength() );
}
file.Write( "ProtectData\n", 14 );
for( int i = 0; i < m_FolderProtectList.GetCount(); i ++ )
{
csBuffer = m_FolderProtectList.GetAt( i );
file.Write( csBuffer, csBuffer.GetLength() );
}
file.Close();
| CDC 글 쓰기 (0) | 2010.03.18 |
|---|---|
| Font 바꾸기 (0) | 2010.03.18 |
| Modal Vs Modless (0) | 2010.03.18 |
| Process 강제 종료 막기 (0) | 2010.03.18 |
| Dialog 메인 윈도우 색 바꾸기 (0) | 2010.03.18 |
| Font 바꾸기 (0) | 2010.03.18 |
|---|---|
| CFile (0) | 2010.03.18 |
| Process 강제 종료 막기 (0) | 2010.03.18 |
| Dialog 메인 윈도우 색 바꾸기 (0) | 2010.03.18 |
| Dialog 아무데나 누르고 창 이동 (0) | 2010.03.18 |
PreTranslateMessage 함수를 재정의 한다. 그래서 특정 값이 들어 오면 다음 함수를 호출 하지 않고 거기서 종료!! 쉽지?
if(pMsg->message == WM_SYSKEYDOWN )
{
//Alt+F4키면무시(Alt키는 VK_KEYDOWN이아니라 VK_SYSKEYDOWN으로알아내야함
if(pMsg->wParam == VK_F4)
{
return TRUE;
}
}
if(pMsg->message == WM_KEYDOWN)
{
if(pMsg->wParam == VK_ESCAPE) return TRUE;
if(pMsg->wParam == VK_RETURN) return TRUE;
}
| CFile (0) | 2010.03.18 |
|---|---|
| Modal Vs Modless (0) | 2010.03.18 |
| Dialog 메인 윈도우 색 바꾸기 (0) | 2010.03.18 |
| Dialog 아무데나 누르고 창 이동 (0) | 2010.03.18 |
| Dialog 항상 위 (0) | 2010.03.18 |
CtlColor 이벤트 추가
m_Back.CreateSolidBrush( RGB( 255, 255, 255 ) );
HBRUSH CH7Dlg::OnCtlColor(CDC* pDC, CWnd* pWnd, UINT nCtlColor)
{
HBRUSH hbr = CDialog::OnCtlColor(pDC, pWnd, nCtlColor);
// TODO: 여기서 DC의 특성을 변경합니다.
hbr = ( HBRUSH )m_Back;
// TODO: 기본값이 적당하지 않으면 다른 브러시를 반환합니다.
return hbr;
}
| Modal Vs Modless (0) | 2010.03.18 |
|---|---|
| Process 강제 종료 막기 (0) | 2010.03.18 |
| Dialog 아무데나 누르고 창 이동 (0) | 2010.03.18 |
| Dialog 항상 위 (0) | 2010.03.18 |
| CRichEditCtrl (0) | 2010.03.18 |
void CH7Dlg::OnLButtonDown(UINT nFlags, CPoint point)
{
// TODO: 여기에 메시지 처리기 코드를 추가 및/또는 기본값을 호출합니다.
CDialog::OnLButtonDown(nFlags, point);
PostMessage( WM_NCLBUTTONDOWN, HTCAPTION, MAKELPARAM( point.x, point.y ) );
}
void CH7Dlg::OnLButtonUp(UINT nFlags, CPoint point)
{
// TODO: 여기에 메시지 처리기 코드를 추가 및/또는 기본값을 호출합니다.
CDialog::OnLButtonUp(nFlags, point);
PostMessage( WM_NCLBUTTONDOWN, HTCAPTION, MAKELPARAM( point.x, point.y ) );
}
| Process 강제 종료 막기 (0) | 2010.03.18 |
|---|---|
| Dialog 메인 윈도우 색 바꾸기 (0) | 2010.03.18 |
| Dialog 항상 위 (0) | 2010.03.18 |
| CRichEditCtrl (0) | 2010.03.18 |
| 리스트 컨트롤 Column 추가 아이템 추가 (1) | 2010.03.18 |
SetWindowPos( &CWnd::wndTopMost, 0, 0, 0, 0, SWP_NOACTIVATE );
| Dialog 메인 윈도우 색 바꾸기 (0) | 2010.03.18 |
|---|---|
| Dialog 아무데나 누르고 창 이동 (0) | 2010.03.18 |
| CRichEditCtrl (0) | 2010.03.18 |
| 리스트 컨트롤 Column 추가 아이템 추가 (1) | 2010.03.18 |
| 리스트 컨트롤 GridLine 추가하기 (1) | 2010.03.18 |
문자열 이어서 넣기
void ChttpDlg::AppendString( const CString str )
{
int nOldLines = 0, nNewLines = 0, nScroll = 0;
long nInsertionPoint = 0;
CHARFORMAT cf;
// Save number of lines before insertion of new text
nOldLines = m_CRichEdit.GetLineCount();
// Initialize character format structure
cf.cbSize = sizeof(CHARFORMAT);
cf.dwMask = CFM_COLOR;
cf.dwEffects = 0; // To disable CFE_AUTOCOLOR
cf.crTextColor = RGB( 0, 0, 0 );
// Set insertion point to end of text
nInsertionPoint = m_CRichEdit.GetWindowTextLength();
m_CRichEdit.SetSel(nInsertionPoint, -1);
// Set the character format
m_CRichEdit.SetSelectionCharFormat(cf);
// Replace selection. Because we have nothing
// selected, this will simply insert
// the string at the current caret position.
m_CRichEdit.ReplaceSel(str);
// Get new line count
nNewLines = m_CRichEdit.GetLineCount();
// Scroll by the number of lines just inserted
nScroll = nNewLines - nOldLines;
m_CRichEdit.LineScroll(nScroll);
}
| Dialog 아무데나 누르고 창 이동 (0) | 2010.03.18 |
|---|---|
| Dialog 항상 위 (0) | 2010.03.18 |
| 리스트 컨트롤 Column 추가 아이템 추가 (1) | 2010.03.18 |
| 리스트 컨트롤 GridLine 추가하기 (1) | 2010.03.18 |
| 리스트 컨트롤 값 얻기 & 검색하기 (1) | 2010.03.18 |
CListCtrl 아이템 다 지우기
DeleteAllItems();
Column추가
ListCtrl.InsertColumn( 0, "aaaa", 0, 100 );
ListCtrl.InsertColumn( 1, "bbbb", 0, 100 );
ListCtrl.InsertColumn( 2, "cccc", 0, 100 );
아이템 추가
LVITEM item;
Zeromemory( &item, sizeof( LVITEM ) );
item.iItem = 0;
item.pszText = "aaa";
for( int i = 1; i < 3; i ++ )
{
ListCtrl.SetItemText( i, j, "다음문자열" );
}
| Dialog 항상 위 (0) | 2010.03.18 |
|---|---|
| CRichEditCtrl (0) | 2010.03.18 |
| 리스트 컨트롤 GridLine 추가하기 (1) | 2010.03.18 |
| 리스트 컨트롤 값 얻기 & 검색하기 (1) | 2010.03.18 |
| 리스트 컨트롤 시스템 아이콘 삽입 (0) | 2010.03.18 |
z_AttrList.SetExtendedStyle(LVS_EX_GRIDLINES | LVS_EX_FULLROWSELECT);
| CRichEditCtrl (0) | 2010.03.18 |
|---|---|
| 리스트 컨트롤 Column 추가 아이템 추가 (1) | 2010.03.18 |
| 리스트 컨트롤 값 얻기 & 검색하기 (1) | 2010.03.18 |
| 리스트 컨트롤 시스템 아이콘 삽입 (0) | 2010.03.18 |
| 리스트 컨트롤 파일 아이콘 추가하기 (1) | 2010.03.18 |
값 얻기 : m_list.GetText( 1, strFind );
m_list.FindStringExact( -1, "문자열" );
m_List.FindString( -1, "문자열" );
if( m_List.FindString( -1, "문자열" ) != LB_ERR ) // 문자열 찾았을 때
GetNextItem( -1, LVNI_SELECTED ) // 선택한 아이템 번호 얻기
| 리스트 컨트롤 Column 추가 아이템 추가 (1) | 2010.03.18 |
|---|---|
| 리스트 컨트롤 GridLine 추가하기 (1) | 2010.03.18 |
| 리스트 컨트롤 시스템 아이콘 삽입 (0) | 2010.03.18 |
| 리스트 컨트롤 파일 아이콘 추가하기 (1) | 2010.03.18 |
| 리스트 컨트롤 색상 다루기 (1) | 2010.03.18 |
CFileFind cFinder;
SHFILEINFO sfi;
BOOL bWorking;
int index = 0;
HIMAGELIST hImageList;
hImageList = ( HIMAGELIST )SHGetFileInfo( *pFolder, 0, &sfi, sizeof(SHFILEINFO), SHGFI_SYSICONINDEX | SHGFI_SMALLICON );
if( hImageList )
{
m_imgShareSmall.Attach( hImageList );
}
else
{
::AfxMessageBox( "파일을 갖고 올 수 없습니다." );
return -1;
}
m_CListCtrlFileList.DeleteAllItems();
m_CListCtrlFileList.SetImageList( &m_imgShareSmall, LVSIL_SMALL );
*pFolder += "\\*.*";
bWorking = cFinder.FindFile( *pFolder );
while( bWorking )
{
bWorking = cFinder.FindNextFile();
SHGetFileInfo( cFinder.GetFilePath(), 0, &sfi, sizeof( SHFILEINFO ),
SHGFI_DISPLAYNAME | SHGFI_TYPENAME | SHGFI_SYSICONINDEX | SHGFI_SMALLICON );
m_CListCtrlFileList.InsertItem( index, sfi.szDisplayName, sfi.iIcon );
if( !cFinder.IsDirectory() )
{
m_CListCtrlFileList.SetItemText( index++, 1, "파일" );
}
else
{
m_CListCtrlFileList.SetItemText( index++, 1, "폴더" );
}
}
m_imgShareSmall.Detach();
| 리스트 컨트롤 GridLine 추가하기 (1) | 2010.03.18 |
|---|---|
| 리스트 컨트롤 값 얻기 & 검색하기 (1) | 2010.03.18 |
| 리스트 컨트롤 파일 아이콘 추가하기 (1) | 2010.03.18 |
| 리스트 컨트롤 색상 다루기 (1) | 2010.03.18 |
| CTRL 값 얻기 (0) | 2010.03.18 |
while (bWorking)
{
bWorking = finder.FindNextFile();
SHGetFileInfo(finder.GetFilePath(),
0,
&sfi,
sizeof(SHFILEINFO),
SHGFI_DISPLAYNAME | SHGFI_TYPENAME| SHGFI_SYSICONINDEX | SHGFI_SMALLICON);
ndx = AddItem1(finder, sfi, ndx);
}
ndx = m_list.InsertItem(ndx, sfi.szDisplayName, sfi.iIcon);
| 리스트 컨트롤 값 얻기 & 검색하기 (1) | 2010.03.18 |
|---|---|
| 리스트 컨트롤 시스템 아이콘 삽입 (0) | 2010.03.18 |
| 리스트 컨트롤 색상 다루기 (1) | 2010.03.18 |
| CTRL 값 얻기 (0) | 2010.03.18 |
| 배경 그림 넣기 (0) | 2010.03.18 |